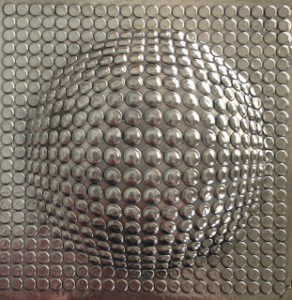
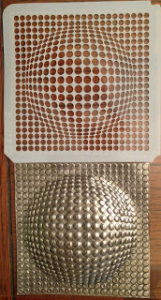
Pewter and Stencils: A Perfect Match
There are many different ways and techniques to do Metal Embossing. One of the easiest ones is using stencils. The main advantages of using stencils are:
*There are thousands of designs to choose from.
*It is one of the fastest and easiest ways to do metal embossing ; just trace the outline of the stencil on the metal and you have already done most of the work.! It will look embossed already.
*Stencils don’t have the size limitation of an embossing machine or embossing folders. You can place the stencil anywhere in the metal and mix several designs in one project. They also give chance to add textures, dimension and volume so your projects don’t look “machine” made as embossing folders- projects usually do.

I used the Optic Circle Stencil and pewter to create this project. The main steps were:
*Place the stencil on the pewter and flip it to its back.
*Rub the paper stump against the metal until you clearly see the stencil design under the metal.
*Outline every part of the stencil design with the refiner tip of the Teflon D-01
*Remove the stencil
*Turn the pewter and place it on a piece of suede. Emboss or push (at the back of the metal, still on the suede) each one of the small circles within the main big circle. Use the appropriate size of Cup and Ball (I used #4 and #6).
*When each small circle has been embossed, place the metal (at the back) on your hand and softly and in round motion, push the metal of the entire big circle using the wooden thumb until you get the desired volume or dimension. This will make the metal really pop out.
*Fill the back of the big embossed circle with the Filling Paste and let it dry (it may take up to 24 hours if the area is big and deep).
*Apply the Pewter Patina with a brush and polish the metal with any silver polishing paste until you get the desired shine.

